
Background
I specialize in Bike Fitting, specifically bike fitting to help clients reduce knee pain. Most of the time I can fix the problem by analyzing, recommending and installing shorter crank arms. But, sometimes there is a medical issue where I need to refer my client to a physical therapist, then, once the issue is corrected, they can return to the bike fit process. In fact, over the past 2 years, I have become the ‘go to’ bike fitter to help those that are experiencing pain.
Dartfish Software
During the process of analyzing crank arm length, I first need to fit one leg that is at ‘Maximum Extension’ (ME). The other term you may hear for this measurement is ‘Bottom Dead Center’ (BDC). The term ME is actually more correct since ME implies measuring where the leg(s) are vs BDC which locates where the crank arm is placed.
Since ME is in a slightly different position from one cyclist to the next, usually 6-7 individual angle measurements need to be taken. Before upgrading to the PRO SUITE, I needed to take an angle measurement each frame for about 6 or 7 frames (see below). This was very cumbersome, time consuming and burdensome for the client since they are still sitting on the fit machine, waiting. The PRO SUITE offers a TRACKING feature that the other versions do not. TRACKING makes it very quick, fast and easy to find ME. But that’s only half of the equation. The hardest part, MAX FLEXION (MF) will be discussed later.
Dartfish Tracking feature
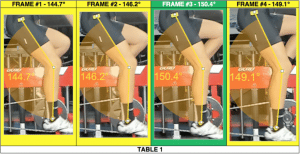
To show what I had to do prior to using PRO SUITE, I would find where I thought ME was located, then I would mark the 3 pivot points (Greater Trochanter, junction between Lateral Condoyle & Fibular Head, Lateral Malleolus)– see FRAME #1 in TABLE 1.
Clicking forward 1 frame, I would delete the previous angle and add a new angle using the angle tool – see FRAME #2, then compare this angle to the angle in the previous frame. In this case, since 146.2° > 144.7°, another measurement needs to be taken. This is because the cyclist is still approaching ME.
Another frame and another deletion and measurement (FRAME #3). In this case, I measured 150.4° which is larger than 146.2°, so yet another frame will need to be evaluated.
The next frame (FRAME #4) yields 149.1° which is less than 150.4° so FRAME #3 might be ME. To be sure, I usually go 1-2 frames more, just to be sure.
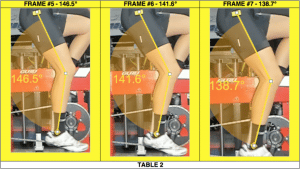
It can be clearly seen that FRAMES #5, 6, 7 (TABLE 2) are decreasing so FRAME #3 at 150.4° is ME.
NOTE: 150° (or 30° depending on which way you are looking at it) is where 99.95% of my bike fit clients feel the most comfortable.
Measuring for ME needs to be done first and once ME has been determined, we can measure for MF.
A Typical Client
I see clients all the time and most of them complain of knee pain. Without using too much medical terminology, EVERY cyclist that complains of knee pain are Hyper-Flexed at the 12o’clock position. They are over flexing all the ligaments, tendons of the knee and even the IT band. These get inflamed and start to hurt. It is like your old gym teacher in high school telling you NOT to squat below parallel, but, these cyclists are all ‘doing squats below parallel.’
The Cause
The resulting pain from the hyperflexed knee is usually caused by a crank arm that is too long. Replacing a too-long-of crank arm with a shorter crank arm yields 3 benefits
a) Need to raise saddle to maintain the same ME. Raising the saddle relieves the hyperflexed state of the knee that is at MF.
b) Shorter crank arms also allow the leg that is at MF to be closer to the center of the crank/bottom bracket further relieving the hyperflexed state of the knee that is at MF.
c) With shorter crank arms, the cyclists’ legs & hips don’t move up and down as far. This relieves wear and tear on the hips.
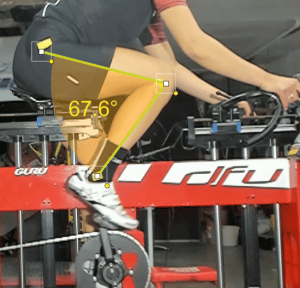
So, once ME is determined, I look at MF. In the picture above, I use Dartfish to measure from the lateral malleolus to the lateral condyle/fibular head junction then up the center of the upper leg. The cyclist pictured is typical of those that tell me that their knees hurt. This is exactly what this cyclist told me as well.
In this case, the cyclist’s initial angle was 63.5° which is well into the RED zone. I prefer to target 70+° and the only way to get there is with shorter crank arms. How short? This basically comes with experience. In this case, this cyclist had 170mm crank arms. To get to the magic number of 70°, we had to eventually go all the way to 160mm crank arms. The photo to the right shows the cyclist with 165mm crank arms. For these angle measurements, it is exactly like the process described for Tables 1, 2.
The Next Step
Purchasing and installing the new shorter crank arms was the next step. After the crank arms were installed, this cyclist told me the knee pain never returned.
Conclusion
Using the right tool for the job really helps cut down the time needed for analysis as well as increases the accuracy of the analysis. Dartfish the right tool for the right way to do bike fitting.
Rick Schultz, MBA, DBA
bikefitnesscoaching@gmail.com
www.bikefitnesscoaching.com
USA Cycling Level 2 Coach
Peaks Coaching Group Coach
Certified Power Based Training
Certified Skills Instructor
Beginner Racer Program Instructor/Coach
Certified Bike Fitter, IBFI Level 3.
Comments are closed.