
Gait analysis using video is a field which encompasses a wide range of uses but whether that be expert customer feedback by the shoe fitter in a specialist sports store, or the qualitative and quantitative analysis by podiatrists, physiotherapists or those fitting prosthetic limbs; we think practitioners in all these fields may learn something from the following gait analysis guide.
The author of this guide, Paul Langer DPM is a US podiatrist and the author of Great Feet for Life, Footcare & Footwear for Healthy Aging. This guide will provide brief explanations of gait analysis along with instructions regarding how you can use Dartfish analyzer tools to properly assess the gait of a client. However, be aware that this is written as a superficial overview of video gait analysis and an understanding of the theory and practice of clinical gait analysis is required in order to truly become proficient. The resources listed at the end of this article are important reading for anyone who may be considering incorporating video gait analysis into their athletic or clinical assessment. A PDF version of this guide is also available.
Video Gait analysis has been increasingly used to evaluate a subject’s movement patterns in order to assist in diagnosing pathologies, improving sports performance and/or monitoring therapeutic interventions such as gait retraining or footwear changes. The tools incorporated into Dartfish high speed video analysis software allow observers to slow down, magnify, and manipulate the video image in order to do such things as calculate joint angles and obtain other measurements. A recent study showed that the reliability of gait parameter data was higher with Dartfish software than with standard video software that lacked these tools (25).
A professional level gait analysis involves much more than watching a video of gait. A detailed clinical exam would also include muscle strength and balance testing, static and dynamic range-of-motion measurements, footwear evaluation, detailed injury and medical history and a review of the athlete’s training program. This would usually be done prior to the video gait analysis.
The Gait Cycle
The gait cycle begins when the foot contacts the ground and ends when the same foot contacts the ground on the next step. The two major components of the gait cycle are the stance phase and the swing phase. These cycles may be further broken down into key points such as initial contact, mid-stance, toe-off for each side.
The stance phase of gait refers to the point in the gait cycle where the foot is in contact with the ground. In normal walking, stance begins at the heel and transitions to the toe and lasts approximately one second. A walker lands with 1-1.5 x bodyweight.
The swing phase of gait occurs after the foot leaves the ground until the next foot contact occurs. The leg is swinging forward and preparing for the next foot strike. Abnormalities or asymmetries in swing phase may indicate a problem during contact that is being compensated for while the leg is in the air.
Walking vs. Running : In walking gait there are periods when both feet are in contact with the ground simultaneously and at least one foot is always in contact with the ground at any given time. In running gait only one foot contacts the ground at a time and there are periods where neither foot is in contact with the ground.
Running gait is more variable. Eighty percent of runners land on their heel when in shoes, and the remaining twenty percent of runners land either on their mid or forefoot. The foot is in contact with the ground for one tenth to five tenths of a second while the runner is landing with 2.4-3.0 times their bodyweight. Overuse injuries to the lower extremity are typically caused during the stance phase of gait.
Barefoot running vs. running in shoes : It has been well documented that humans move differently when barefoot, so comparing barefoot running gait to gait in shoes is like comparing apples to oranges. Walking barefoot provides a baseline assessment of a subject’s weight bearing functional movement pattern and is an important part of any analysis. Anyone will quickly see that it is much more difficult to confidently assess the alignment of the foot once it is covered by a shoe – even with high speed and stop-motion video. (20)
Gait analysis protocol
Most gait labs and clinics have their own specific criteria and protocols for video gait analysis. The protocol described here is just one example of how it may be done to obtain a relatively quick biomechanical profile and functional assessment. The specific protocol used is determined by the expertise of the observer(s), the lab and/or setting of the study and by the goals of the analysis whether they are improving sports performance, evaluating an injury or assessing therapeutic interventions.
Warm up/adaptation to treadmill: The video gait exam does not start immediately. Subjects need to acclimate to the walking/running surface, either a track or a treadmill, by allowing at minimum of 4-5 minutes of warm up in order to acclimate to the running surface and environment. It is important to remember that humans move differently on treadmills as well as when they know they are being observed. (32)
Walking and running speed: In most settings the test subject should select the walking/running speed based on their comfort. It is known that humans are pre-programmed to move in the most metabolically efficient manner for the given conditions so forcing a subject to run at a speed or cadence that does not feel natural or comfortable to them will affect the validity of any observations made (33, 34, 35). The patient’s movement patterns will change with alterations in the speed of the treadmill. For example, running stride lengthens, knee flexion at contact and foot contact time decrease when speed is increased. If on a treadmill, the speed of each individual’s video session should be recorded so that follow-up evaluations on that subject will most closely duplicate the conditions of previous studies.
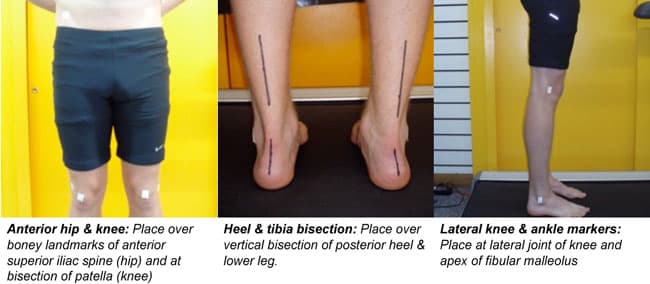
Clothing: Compression shorts and sleeveless tops are ideal in order to visualize the best detail. Loose clothing obscures movement and makes it more difficult to place markers on anatomic landmarks. Again, assessing the movement of the foot inside the shoe is also very difficult which is why initial assessment of foot motion should be done barefoot.
Skin markers: Observation can be done either with or without markers but measuring functional joint angles are best done with markers. Reflective or standard athletic tape may be used for skin markers. It is important to keep in mind that it takes experience and knowledge of anatomy to place markers properly. Improperly placed markers will dramatically reduce reliability of observations. A known limitation of skin markers is that the skin is freely movable over the joint so it should not be assumed that the skin marker is a 100% accurate depiction of joint movement. The Pro software uses clear contrast to accomplish tracking ; therefore, choose a tape that visibly contrasts with the subject.
Video camera placement
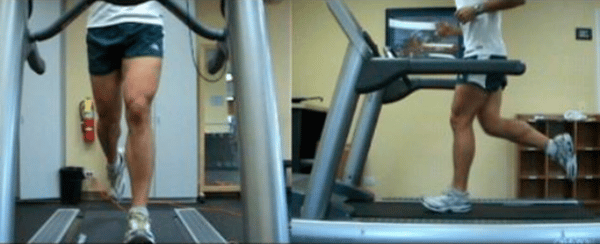
In addition to understanding basic gait protocol, you must also have basic knowledge about how to properly set-up the filming area. Views from the front, back and side should be obtained in order to assess at least two dimensions. The view from behind is most useful for assessing rear foot motion, hip obliquity, shoulder and arm motion. The front view is most useful for knee adduction, in-toeing/out-toeing, shoulder height and arm symmetry. The lateral view allows for visualization and measurement of hip, knee and ankle flexion and extension. The camera should be placed sufficiently close to the subject to capture the area of interest. A wide angle lens can be helpful in some settings. Some examiners may capture a head-to-toe video during baseline walking ; then focus on the legs only for example, during running gait. It is important that the camera is equal in height and level with the area being observed and the lens is 90 degrees to the subject if one wishes to make accurate angle measurements of joints using Dartfish tools. Dartfish distance tools require a point of reference in the same plain as the athlete to calibrate measurement. Mark the treadmill side and back with a tape of a meter, for example.
Many tripods have built-in levels to assist in this. A carpenter’s level should be used to ensure that the deck of the treadmill is level both from front to back and side to side. The floor and treadmill can be marked with tape to make repeatability easy and quicker when moving the camera and lining up the subject. Use the shutter speed and focus features of the camera to optimize subject clarity and avoid blurring of the movement. Lighting should be direct on the subject and avoid back lighting which may darken the camera aperture intake.

Software Set-up and Capture
The ProSuite edition of the software allows two-camera synchronized capture from a live video feed. This allows remote control capture of two video clips simultaneously and facilitates the use of video greatly. Both the Pro and the basic Connect edition import video from a variety of sources for post-capture analysis. If you have only one camera or the Connect or Live editions, you can easily capture video from different views. Capture video from the first view, and then move the camera to another side. See Appendix 1.
Observations
A typical gait analysis protocol starts with a general assessment and becomes more focused. Initial assessment looks for symmetry and smoothness of movement while observing the subject from head to toes. Observations should be made from the front, back and side with the subject on a runway or on a treadmill with zero incline. The patient should warm-up and then self-select the walking or running speed. The following general observations will be made:
- Alignment of head
- Shoulder height/symmetry
- Symmetry of arm swing
- Asymmetry of internal/external rotation of legs
- Angle and base of gait (the angle of the feet in relation to the lower leg when observed from behind and how far apart the feet land when hitting the ground)
- Stride length
- Asymmetry of Weight Shifting at the Hips
- Movement of the trunk
- Rise of the body are assessed and measured (1, 10, 11).
These observations are made first walking barefoot and then running in subject’s footwear which may also include insoles or orthotics.
Although quantitative measures of speed, cadence and stride length are easily obtained using Dartfish, many researchers question the value of these measurements since there is such a broad range of normal. For example, intrinsic factors such as subject height, sex, and extrinsic factors such as length of runway, treadmill or even room size affect these gait parameters. (9,13, 14)
Dartfish Analyzer
In order to accurately assess arm swing, trunk movement, foot strike, etc., you must use a measurement tool. The Dartfish Analyzer Mode tool will allow you to view the video frame-by-frame and take measurements of such movements. The Analyzer can compare up to four videos at a time, blend, annotate and mark important moments within videos. A variety of analysis tools are available see Appendix 1.
Key Kinematic angles to observe
Key kinematic angles and events as described by Kirtley in his text, Clinical Gait Analysis Theory & Practice (10) are as follow below. These are not, of course, the only key events that should be considered but they do include the most important elements of gait analysis. The ranges of what are considered normal range of motion are variable and are best considered as benchmark figures as there is not universal agreement on what actually constitutes normal in terms of many parameters of human movement.
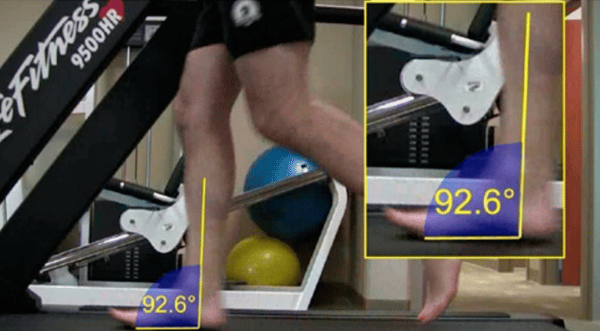
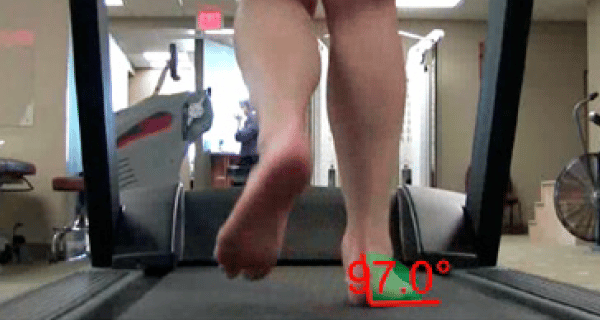
Ankle dorsi-flexion at contact: Select the frame just as the foot contacts the ground. The angle is drawn with the apex at the bottom heel surface of the foot and one arm through the ankle joint to the mid-shaft of the leg (tibia) (28). Additional key positions from the side can include : Initial Contact, Stance (mid-stance), and Toe-off (pre-swing).
- Normal: 10 degrees dorsiflexion -10 degrees plantarflexion. Heel strikers will be dorsiflexed but mid and forefoot strikers will be plantarflexed.
- Significance : A tight Achilles tendon or calf muscles may limit ankle motion and can predispose an athlete to Achilles tendonitis or other injuries.

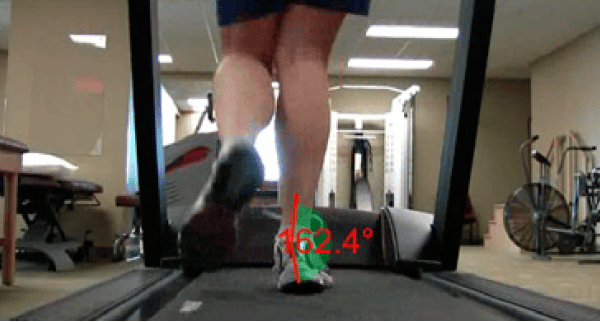
Maximum Rear Foot Eversion: Select the frame from the video at the point just before the heel starts to lift off the ground. The angle is drawn with the apex at the level of the ankle, with one arm along the center of the lower legs, and the other along the center of the heel. This is much easier to observe when the patient is barefoot. Additional key positions from rear include : Maximum rear foot eversion and prolonged rear foot eversion of both R and L.
- Normal: The rear foot should be vertical as the heel starts to lift in late stance phase of gait.
- Significance : When the rear foot everts too much and/or too long this is known as overpronation and has been linked to overuse injuries such as Achilles tendonitis, patellofemoral pain, iliotibial band syndrome and plantar fasciitis. The duration of pronation is important to note, even more so than the amount of pronation, because prolonged pronation is far more problematic.
Knee Flexion at contact: Select the frame just as heel contacts the ground. Apex of angle is placed at level of knee joint with arms bisecting the thigh and the lower leg respectively. Other key positions may include mid-stance and toe-off.
- Normal : Peak knee flexion is approximately 15-40 degrees.
- Significance : Impact loads to the knee are increased with a straighter (less flexed) knee at initial contact. Faster running speed and longer strides result in decreased knee flexion at initial contact.
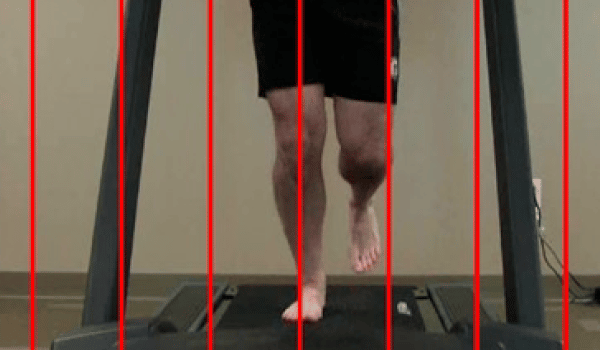
Knee adduction in late stance: Using the vertical line tool, drag a line to the midline of the knee after selecting the frame of video where the knee is at its lowest point (maximum knee flexion). Additional key points include R and L heel-strike, mid-stance and toe off.
- Normal: As the knee flexes during the stance phase of gait, the patella should line up with the 2nd toe.
- Significance : Deviations away from the second toe place strain on the knee and can be the result of an over-pronated foot, over-supinated foot and/or weakness of the core muscles. Patellofemoral pain, iliotibial band syndrome and Achilles tendonitis are often related to abnormal knee adduction.
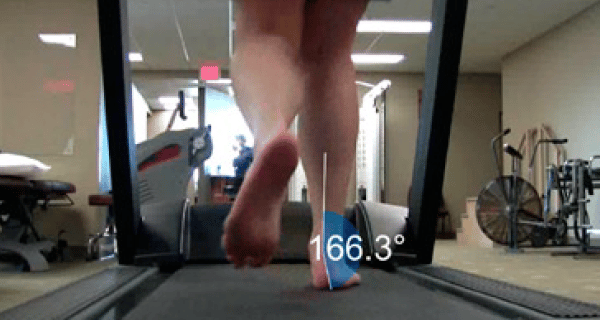
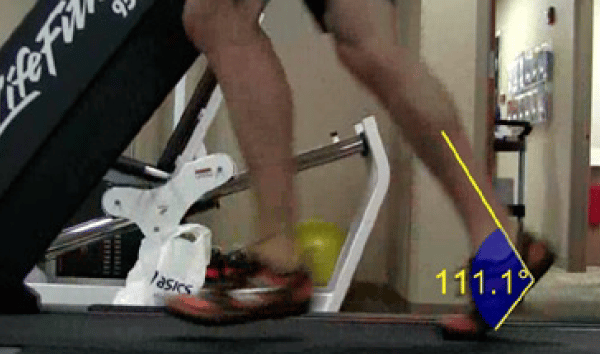
Ankle Plantar-flexion during push-off: Select the frame from the video when the toe is about to leave the ground, and then measure the angle by placing apex at the bottom and back of the ankle. Finally, place the arms throughthe center of the leg.
- Normal Range : approximately 20-30 degrees
- Significance : Restricted ankle motion, restricted great toe motion or weakness of the calf muscles can cause compensations that result in Achilles tendonitis, plantar fasciitis and may even affect the knee, hip or low back.
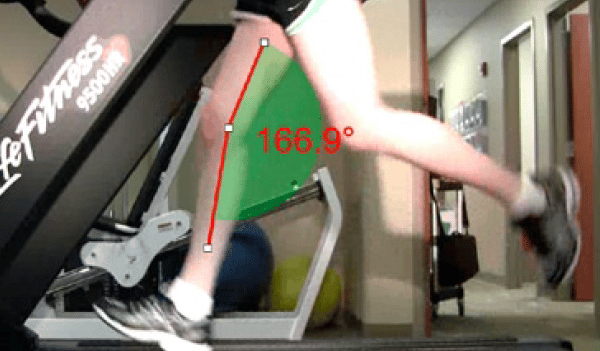
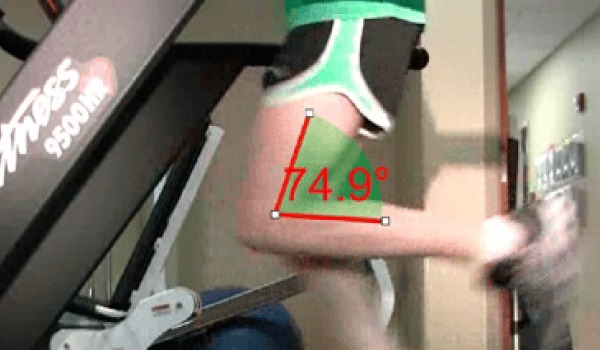
Knee Flexion in Swing Phase: Select the frame from the video in which the knee is at the peak of flexion in the swing phase.Place the apex at the level of the knee and arms, along bisections of the thigh and low leg.
- Normal Range : 5 – 130 degrees
- Significance : Restricted knee range of motion can indicate imbalances between hamstrings and quadriceps which may contribute to knee, hip or thigh injuries
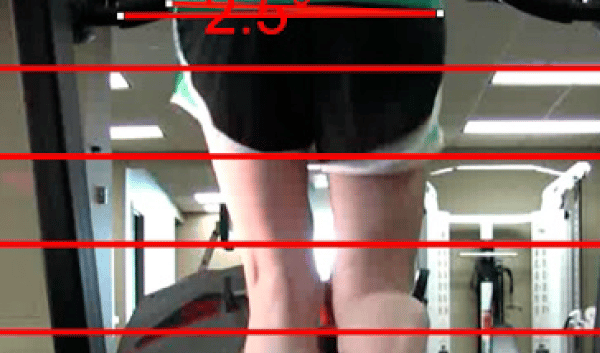
Hip motion – pelvic obliquity: Use a horizontal line grid and/or place markers over the posterior superior iliac spine, and then measure the angle between a horizontal line grid and horizontal bisection of the markers.
- Normal walking gait : the pelvis drops 4-5 degrees from the stance leg to the swing leg (1).
- Significance : Asymmetry may indicate limb length inequality, dysfunction of the spine and/or hip joints, muscle imbalances such as weakness of gluteus medias.
Key Positions
Dartfish’s Key Position feature allows the main points of observation, such as those above, to be saved within the video as embedded pictures plus drawings and written notes and audio comments. These observations may be printed or published in an interactive video with key positions. Key positions may also be used as a template that can be easily transferred, from video to video, for a standard assessment protocol. There is still no single universally agreed upon model of normal human gait. However, to aid in developing your observational expertise, example Mediabooks with printable Key Positions are featured on the on a dartfish.tv channel dedicated to physical therapy.
To close, I’d like to make the observation that gait analysis is not black and white – it is still very much part art and part science. The science is becoming better and better especially with the availability of such tools as Dartfish.
Resources & references
The references cited in this article and other resources which Mr Langer has recommended can be found at the end of the PDF version of this document.
Appendix 1 provides an overview of the Dartfish software functions mentioned in this article and offers recommended settings for gait analysis.
Appendix 2 is a useful checklist of static and dynamic observations and measurements to be made as part of a gait assessment.
Comments are closed.